
Tile floors added modern and luxury vibe into the home interior. However they are too fragile and can easily break or crack with heavy weight or something heavy that drops on tiles with pressure. A cracked or chipped ceramic tile can make your beautiful floor look less than perfect. But don’t worry—it’s easier to fix than you think! A cracked tile not only looks unattractive, but may worsen over time or lead to further damage. In this article we’ll discuss some tips or methods to guide you through how to fix cracked ceramic tile, cracked floor tile, and even chipped tile in just a few steps.
Why do Ceramic Tiles Cracked or Chipped :
Common causes:
- Insufficient adhesive or epoxy make tiles prone to cracking.
- Dropping heavy or sharp objects on tiles can also lead to crack or chip.
- Gaps or uneven surfaces under the tile may also cause crack or damage.
- Heavy furniture or appliances can put too much pressure on tiles, especially when tiles are thin or poorly supported.
- Over time, ceramic tiles can weaken, susceptible to damage.
- Excessive moisture beneath the tiles can vulnerable the adhesive bond or expand material, leading to damage.
- Improper handling during installation or manufacturing can cause chips or crack.
To prevent your tiles from these issues, use quality materials, ensure proper installation, also if you do timely maintenance of your tiles, it makes your tile look freshy & new. All these small steps protect your tiles from worsening damage or big cracks.
Tools and Materials you’ll Need :
- Tile Adhesive or Epoxy
- Fine brush
- Putty Knife
- Utility knife
- Paint or Glaze for touch ups (optional)
- Safety gear like Gloves or Goggles.
- Grout
- Hammer
- Damp Cloth / Towel
- Sponge
- Replacement tile (for larger crack)
Having right or quality materials and tools ensure clean and lasting repair.
Fix the Cracked Ceramic Tile (For Minor Crack):

Step 1: (Remove Debris)
Firstly remove the debris and dirt from the cracked tile with a brush or with damp cloth if needed. Use a dishwasher or alcohol on a sandpaper or towel to clean the floor properly. Then make sure you wear a mask and gloves because some materials can cause allergic reactions on your skin, especially epoxy that creates respiratory infection.
Step 2: (Apply Epoxy on the surface of Cracked Tile)
Then apply epoxy or adhesive glue on that cracked part of tile thoroughly and use a fine tool or putty knife to apply epoxy or adhesive into the cracked part. Wipe the surface with a paper or microfiber to smooth the surface and remove access epoxy before it dries.
Step 3: (Use Paint or Glaze on the Tile)
Once the filler dries, use a small brush to paint the same color or glaze as tile on the surface of the cracked filler part.
Step 4: (Seal the Repair if needed)
Then lastly apply the urethane sealer on the filler or repair part of ceramic tile to protect it from the repair and make it less noticeable.
Replace the Tile (For Severe Cracks or Broken Tiles):
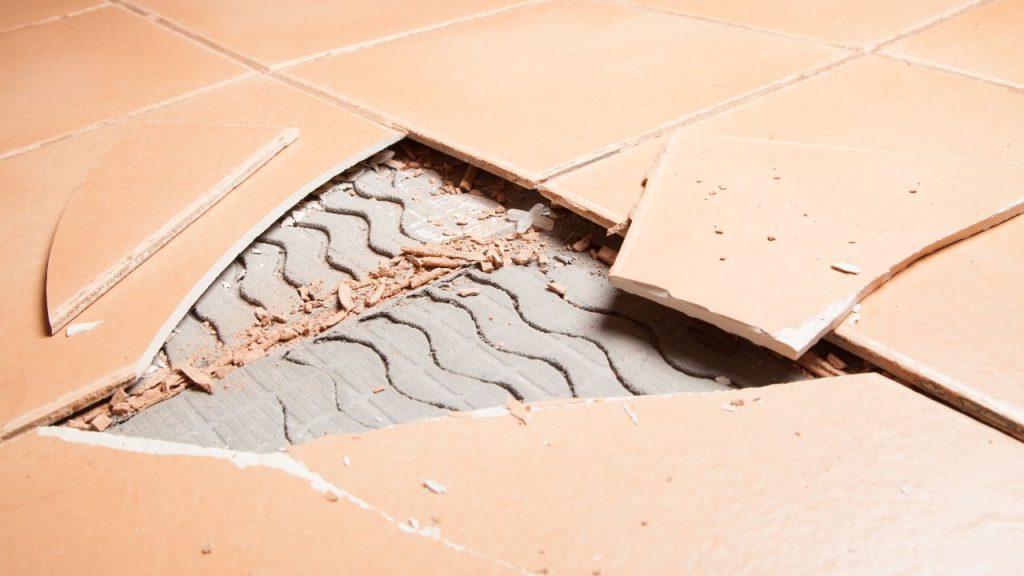
Step 1: (Break the Damage Tile)
Use a hammer or chisel to break the damaged tile, without damaging the surrounding tiles. Then remove the tile pieces carefully. Make sure you wear hand gloves.
Step 2: (Remove the Adhesive)
It is hard to remove it but with the right techniques, it can be done easily.
Use a heat gun or hair dryer to heat dry adhesive, if heat is not working then use warm water. Then scrap the adhesive by a putty knife and hammer for stubborn areas. If all of these are not working, then use commercial adhesive remover. Clean the surface for the new tile properly.
Step 3: (Install the Replacement Tile)
Spread the layer of tile adhesive or epoxy on the subfloor using a fine brush. Then place the new tile on adhesive firmly and ensure proper alignment of tile. Allow the adhesive to dry for the recommended time (usually for 24 hours).
Step 4: (Grout the Tile)
Fill the parts around the tile with grout using a grout float. Wipe the excess grout with a wet sponge or towel and let it dry.
Step 5: (Clean the Seal)
Once all the process is done, wipe all the dirt from the subfloor and if you need grout sealer, then apply that for a fine finish. Now your tile is replaced with a fine touch.
Tips for Preventing Future Damage to Your Ceramic Tiles:
- Use a floor mat in high-traffic areas.
- Seal grout once in a year to maintain tile integrity.
- Avoid dragging heavy furniture across tiles regularly.
- Also avoid heavy objects dropping on tiles.
FAQs: Common Questions About Fixing Cracked & Chipped Ceramic Tiles
- Can I fix a cracked tile without replacing it?
Yes, small cracks can be repaired with epoxy or tile adhesive easily.
- What if my floor tile keeps cracking?
Persistent cracking may indicate underlying structural problems or excessive moisture beneath the tiles. Consult a professional.
- How can I make my repair less noticeable?
Use paint or glaze the same as tile, to blend the repair area on the rest of the tile.
- Is it expensive to replace a single tile?
Replacing a single tile is relatively inexpensive as compared to an entire floor, especially if you do it yourself.
- How long does a tile repair last?
Proper repairs can last years if done correctly and with quality materials.
- What is the best glue for cracked floor tiles?
Epoxy is the most common for the cracked repair process and it has a good quality for adhesive property.
Check out our other DIY home improvement guides to save time and money on your projects. Visit our site Prep-N-Reno if you live in Edmonton and want to hire a professional for cracked tile repair or replacement.